How to enable the 3G and Wi-Fi connectivity on the SXPiPublication Date: 26-02-2015 | Versione Italiana  | English Version | English Version 
|
In this article we will see how to configure the Linux box SXPi to access a Wi-Fi network and make a data connection over 3G network.

Description
In this article we will see, step by step, how to enable and configure the Wi-Fi and 3GSXPi.
The Linux box is equipped with a Telit HE910-EUG modem 3.5G generation, compliant with the standard GSM/GPRS (850/900/1800/1900MHz),
UMTS/ HSPA(850/900/2100MHz), which we will see how to configure to make a data connection.
To enable Wi-Fi connectivity on SXPi, you need to mount a USB-WiFi optional converter.
Further details about the SXPi are available by reading the article: SXPi not just a Linux Box
Hardware Requirements
o test all the functions described in the present article, you need the following hardware:
Wi-Fi connection
The SXPi is not natively equipped with a Wi-Fi interface, it is therefore necessary to connect
a (optional) Wi-Fi adapter on the USB port located on the Ethernet side of the Linux box.

The complete list of the compatible Wi-Fi adapters is available at the following URL:
http://elinux.org/RPi_USB_Wi-Fi_Adapters
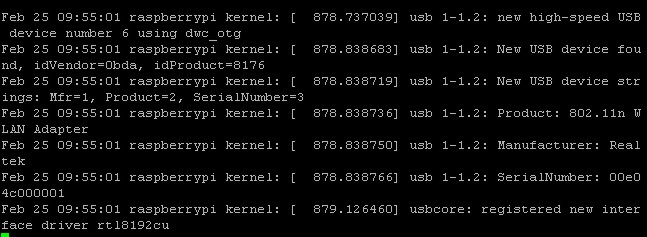
Once connected the USB-WiFi dongle, you can control via SSH or serial console the correct recognition of the Wi-Fi device
checking the file /var/log/messages with the command:
tail -f /var/log/messages

To allow the Linux system accessing a Wi-Fi wireless network, you need to proceed with the following steps.
On console:
sxpi@raspberrypi ~ $sudo vim /etc/network/interfaces
and enter the following instructions, if not present:
allow-hotplug wlan0

iface wlan0 inet manual

wpa-roam /etc/wpa_supplicant/wpa_supplicant.conf

iface default inet dhcp
On the contrary, if you want to assign a static IP address to the Wi-Fi interface, the instructions to set are the following:
allow-hotplug wlan0

iface wlan0 inet manual

wpa-roam /etc/wpa_supplicant/wpa_supplicant.conf

iface wlan0 inet static

address 192.168.0.XXX

netmask 255.255.255.0

gateway 192.168.0.XXX
Of course the items address, netmask and gateway must be compatible with your own Wi-Fi LAN.
If the Wi-Fi network to which you want to connect the SXPi it is protected, for example, with WPA2 encryption,
you must edit the file wpa_supplicant.conf in the following way:
sxpi@raspberrypi ~ $ sudo vim /etc/wpa_supplicant/wpa_supplicant.conf


ctrl_interface=DIR=/var/run/wpa_supplicant GROUP=netdev

update_config=1

network={

    ssid="www.areasx.com"

    key_mgmt=WPA-PSK

    scan_ssid=1

    proto=RSN

    pairwise=CCMP TKIP

    group=CCMP TKIP

    psk="password"
}
and enter the SSID name of Wi-Fi network and the protection password (psk).
Restart the Linux box:
sxpi@raspberrypi ~ $ sudo reboot
The correct working of the Wi-Fi link can be checked with the following commands:
sxpi@raspberrypi ~ $ sudo iwconfig wlan0

sxpi@raspberrypi ~ $ sudo ifconfig wlan0

Data connection on 3G network
As previously said, the SXPi is equipped with Telit H910, a 3.5 generation modem that is able to perform data connections with speed up to 14.4 Mbit/s
where allowed by the chosen Mobile Operator and network.
By default setup, the modem on SXPi is turned off.
Before you start the boot procedure of the modem, you must connect the GSM/UMTS antenna to the SMA male connector
and plug a SIM card with PIN disabled and qualified for data connection.

To turn on the modem, you need to keep high for about 5sec the GPIO line 22 (pin 15) of the ARM 11 processor.
This operation can be carried out automatically creating a bash script (eg: start-modem) with the following code:
echo 22 > /sys/class/gpio/export

echo out > /sys/class/gpio/gpio22/direction


echo 18 > /sys/class/gpio/export

echo in > /sys/class/gpio/gpio18/direction


ST=`cat /sys/class/gpio/gpio18/value`

if [ "$ST"=="0" ]; then

  echo 1 > /sys/class/gpio/gpio22/value

  sleep 5.0

  echo 0 > /sys/class/gpio/gpio22/value

fi


echo 22 > /sys/class/gpio/unexport

echo 18 > /sys/class/gpio/unexport
To turn the modem on every boot, the script must be inserted into the file /etc/rc.local.
The correct ignition of the modem is shown by the yellow LED placed on top of the SXPi.
With the modem turned on, now we can go forward to the configuration of the ppp software daemon, needed to establish a data connection over GPRS/UMTS network.
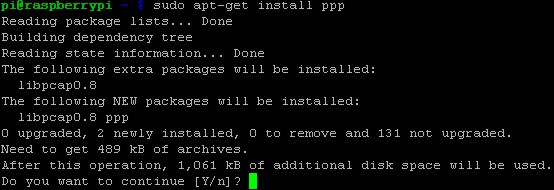
To install the ppp software deamon, you must type the following command on console:
sxpi@raspberrypi ~ $ sudo apt-get install ppp

Once the installation is completed, then you have to edit the pap file:
pi@raspberrypi ~ $ sudo vim /etc/chatscripts/pap
And enter:
TIMEOUT      60

ABORT        BUSY

ABORT        VOICE

ABORT        "ERROR"

ABORT        "NO CARRIER"

ABORT        "NO DIALTONE"

ABORT        "NO DIAL TONE"

""           ATZ

OK           AT+CGDCONT=1,"IP","apn.operator","0.0.0.0",0,0

OK           ATD*99***1#

CONNECT      ""
In place of the entry "apn.operator", you must enter the APN address of your Mobile Operator
(eg. TIM: ibox.tim.it VODAFONE: mobile.vodafone.it H3G: tre.it).
To force the modem in operating on 3G network, also set in your pap the command:
OK AT+WS46=22
Edit the file provider:
sxpi@raspberrypi ~ $ sudo vim /etc/ppp/peers/provider
and enter and/or modify the entries:
user "@"

...

...

# Serial device to which the modem is connected.


/dev/ttyACM0


# Speed of the serial line.


460800


...


...

# Use this connection as the default route.


defaultroute

replacedefaultroute
At this, you can: establish the data connection ppp on 3G network with the pon command:
sxpi@raspberrypi ~ $ sudo pon
stop the connection with the poff command:
sxpi@raspberrypi ~ $ sudo poff
Any eventual error is shown by chacking the system log:
tail -f /var/log/messages

The correct routing of the Internet data can be displayed with the commands
route and a ping towards a public server.

Related articles
SXPi not just a Linux Box
Programmare in Python il Gatetel EzMOTO
Trasformare la SXPi in un mini server LAMP
Download
 Documentation: Manuale_SXPi.pdf Documentation: Manuale_SXPi.pdf
 Documentation: Telit_HE910_UE910_AT_Commands_Reference_Guide_r5.pdf Documentation: Telit_HE910_UE910_AT_Commands_Reference_Guide_r5.pdf
 Documentation: GT-HE910_EUD_B_Product_Description.pdf Documentation: GT-HE910_EUD_B_Product_Description.pdf
Segnala questo articolo:
|

 Articles
  Microcontrollers
  Linux Embedded
  How to enable the 3G and Wi-Fi connectivity on the SXPi

 Articles
  Microcontrollers
  Linux Embedded
  How to enable the 3G and Wi-Fi connectivity on the SXPi